Making a canopy for a bakkie is simple and rewarding. You can customize it to your needs and save money.
A canopy can protect your gear, provide shelter, and improve your bakkie’s look. You don’t need to be an expert to build one. With basic tools and materials, you can create a sturdy, functional canopy. This guide will walk you through the process step by step.
You’ll learn about measuring, selecting materials, and assembling your canopy. Whether for work or leisure, a homemade canopy offers flexibility and satisfaction. Get ready to transform your bakkie with a project you can be proud of. Let’s dive in and start building!
Materials And Tools Needed
Creating a canopy for a bakkie can be a fun and rewarding project. To ensure success, gather all the necessary materials and tools before starting. This section will help you understand what you need.
Essential Materials
To build a sturdy canopy, you will need some key materials. Start with quality aluminum sheets. These provide a strong, lightweight structure. Next, get some steel tubing. This will form the frame of your canopy. You will also need a set of hinges. These allow for easy opening and closing of the canopy. Don’t forget the rivets. Rivets hold the aluminum sheets together securely.
Weatherproofing materials are also important. Look for rubber seals and silicone caulk. These keep water and dust out of your bakkie. Lastly, choose a lock mechanism. This ensures your canopy stays closed and secure.
Required Tools
Having the right tools makes the job easier. Begin with a power drill. This helps in making holes for the rivets. A rivet gun is essential. It secures the aluminum sheets to the frame. You will also need a metal saw. This tool cuts the steel tubing to the right size.
A measuring tape is crucial. It ensures all parts are cut accurately. A marker helps in marking measurements on the materials. A set of screwdrivers is also necessary. They assist in attaching hinges and locks. Finally, keep a pair of gloves handy. They protect your hands while working with sharp materials.
Planning And Design
Creating a canopy for your bakkie requires careful planning and design. A well-designed canopy enhances your vehicle’s functionality and aesthetics. Let’s explore the essential steps to get started.
Measuring Your Bakkie
First, measure your bakkie accurately. Use a tape measure to determine the length, width, and height of the cargo area. Write down these measurements. They will guide the design process.
Consider the space above the roofline. You might need extra height for certain designs. This ensures the canopy fits well and looks professional.
Choosing A Design
Next, choose a design that suits your needs. Think about what you will use the canopy for. Do you need extra storage or a sleeping area? The design should match your requirements.
Look at different canopy styles. Some popular designs include flat, raised, and custom shapes. Each has its own advantages. Select a design that complements your bakkie’s look.
Building The Frame
Creating the frame for a bakkie canopy is a key step. It ensures the structure is strong and stable. Proper measurement and assembly are crucial. This guide will help you build a reliable frame.
Cutting The Frame Pieces
Start with measuring the bakkie’s dimensions. Precision is important. Use a tape measure for accurate readings. Write down the measurements. You will need a saw to cut the pieces.
Use aluminum or steel tubes for the frame. They are both strong and light. Cut the tubes according to the measured dimensions. Ensure each piece is smooth. Check for any rough edges. Smooth them out with sandpaper.
Assembling The Frame
Lay out the cut pieces on the ground. Arrange them in the shape of the frame. Use clamps to hold the pieces together. This will help in aligning them properly.
Next, use bolts and screws to join the pieces. A drill will be useful for this task. Drill holes where the pieces meet. Insert bolts and tighten them with a wrench.
Check for any loose connections. Tighten them as needed. Ensure the frame is square. Use a carpenter’s square to verify the angles.
Here is a simple table summarizing the tools and materials:
| Materials | Tools |
|---|---|
| Aluminum/Steel tubes | Tape measure |
| Bolts and screws | Saw |
| Sandpaper | |
| Clamps | |
| Drill | |
| Wrench | |
| Carpenter’s square |
Following these steps will give you a solid frame. This foundation is essential for your bakkie canopy.
Adding The Panels
Adding the panels to your bakkie canopy is a crucial step. It involves selecting the right materials and attaching them securely to the frame. This section will guide you through the process, ensuring your canopy is durable and functional.
Selecting Panel Material
Choosing the right panel material is essential. You need something lightweight but strong. Common options include:
- Aluminum: Lightweight and rust-resistant.
- Fiberglass: Durable and easy to shape.
- Steel: Strong but heavier.
Consider your needs and budget. Aluminum is great for reducing weight. Fiberglass offers flexibility in design. Steel provides maximum strength but adds weight. Each material has its pros and cons.
Attaching Panels To Frame
Once you have your panels, it’s time to attach them to the frame. Follow these steps:
- Measure: Measure the frame to ensure panels fit perfectly.
- Cut: Use a saw to cut panels to the right size.
- Position: Place the panels on the frame, aligning edges.
- Secure: Use bolts or screws to attach panels to the frame. Ensure tight and secure fittings.
- Seal: Apply a sealant to prevent water ingress.
Proper attachment ensures your canopy withstands various weather conditions. Double-check all fittings for security and strength.
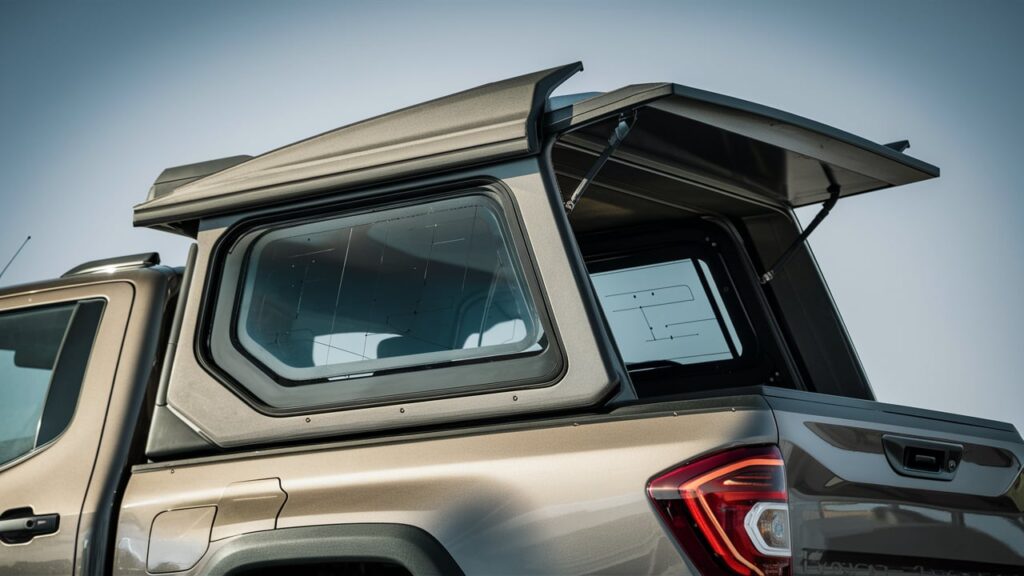
Installing Windows And Doors
Installing windows and doors in your bakkie canopy can seem challenging. But with the right tools and instructions, you can do it efficiently. This section will guide you through choosing and installing windows and doors for your canopy.
Choosing Windows And Doors
Selecting the right windows and doors is crucial. The correct choice enhances both functionality and appearance. Consider these factors:
- Material: Choose durable materials like aluminum or fiberglass.
- Size: Ensure the windows and doors fit your canopy’s dimensions.
- Style: Sliding or hinged options are available.
- Security: Look for lockable options for added security.
Compare different brands and read reviews to make an informed decision. Here’s a comparison table to help you out:
| Brand | Material | Style | Security Features |
|---|---|---|---|
| Brand A | Aluminum | Sliding | Lockable |
| Brand B | Fiberglass | Hinged | Non-lockable |
| Brand C | Aluminum | Sliding | Lockable |
Installation Process
Once you have chosen the windows and doors, it’s time to install them. Follow these steps for a successful installation:
- Gather Tools: You will need a drill, screws, sealant, and a measuring tape.
- Measure and Mark: Measure the areas where the windows and doors will go. Mark the spots with a pencil.
- Cut Openings: Use a jigsaw to cut the marked areas. Ensure the openings match the window and door sizes.
- Install Frames: Place the window and door frames in the openings. Secure them with screws.
- Seal Gaps: Apply sealant around the edges to prevent water leaks.
- Check Alignment: Ensure everything is aligned and functions smoothly.
Remember to follow the manufacturer’s instructions for specific details. Proper installation ensures your windows and doors are secure and functional.
Sealing And Waterproofing
Ensuring your bakkie canopy is sealed and waterproofed is crucial. It protects your goods from rain, dust, and other elements. A well-sealed canopy extends the lifespan of your bakkie and keeps your cargo safe. Let’s dive into the steps for effective sealing and waterproofing.
Applying Sealant
Applying sealant properly prevents water from seeping into your canopy. Follow these steps for a perfect seal:
- Clean the Surface: Ensure the edges are clean and free of debris.
- Choose the Right Sealant: Use a high-quality silicone or polyurethane sealant.
- Apply Evenly: Use a caulking gun to apply the sealant evenly along the seams.
- Smooth the Sealant: Use a spatula to smooth the sealant for better adhesion.
- Let it Dry: Allow the sealant to dry completely before testing for leaks.
Waterproofing Tips
To ensure your canopy is fully waterproofed, consider the following tips:
- Inspect Regularly: Check the sealant for cracks or gaps periodically.
- Reapply as Needed: Reapply sealant every few years or as needed.
- Use Waterproof Covers: Invest in waterproof covers for extra protection.
- Check Weatherstripping: Ensure all weatherstripping is intact and in good condition.
Following these steps will help you maintain a durable and waterproof canopy for your bakkie. Keep your cargo safe and extend the life of your vehicle.
Painting And Finishing Touches
Once you’ve built your bakkie canopy, the next step is painting and adding finishing touches. This step is crucial for both aesthetics and protection. A well-painted canopy not only looks good but also resists weather elements.
Choosing Paint
Choosing the right paint is essential. You need paint that can withstand outdoor conditions. Enamel paints are a good option. They provide a hard, durable finish. You may also consider automotive spray paint. It offers a smooth, even coat.
Pick a color that matches your bakkie. It creates a cohesive look. Before painting, clean the canopy surface. Remove any dust or grease. Use sandpaper to smooth rough edges. This ensures the paint adheres well.
Applying Finishing Touches
After painting, let the canopy dry completely. This may take several hours. Once dry, inspect for any missed spots. Touch up any areas with a fine brush.
Next, add weather stripping to the edges. This prevents water from seeping in. You can also install locks for security. These ensure your belongings stay safe. Consider adding windows if you need ventilation.
Finally, clean the canopy one last time. Use a soft cloth to remove any dust. Your canopy is now ready for use. Enjoy your new bakkie accessory!
Installation On The Bakkie
Installing a canopy on your bakkie can enhance its utility and appearance. It provides protection and extra storage space. Follow these steps to install a canopy on your bakkie efficiently.
Preparing The Bakkie
Before you start, clean the bakkie thoroughly. Remove any dirt or debris from the bed. This ensures a smooth installation process and prevents damage to the canopy.
- Measure the bakkie bed to ensure the canopy fits perfectly.
- Check for any existing damages on the bakkie bed.
- Gather all necessary tools, such as wrenches, screwdrivers, and clamps.
Place the canopy near the bakkie. This makes it easier to lift and install. You might need extra hands to help lift the canopy onto the bakkie bed.
Securing The Canopy
Once the canopy is positioned correctly, it’s time to secure it. Align the canopy with the bakkie bed and ensure it’s centered.
- Attach the clamps to the canopy and bakkie bed.
- Tighten the clamps using a wrench. Ensure they are secure but not overly tight.
- Check for any gaps or misalignments. Adjust the canopy if needed.
- Install any additional bolts if provided by the manufacturer. This adds extra security.
After securing the canopy, check its stability. Push and pull gently to ensure it doesn’t move. Test the canopy by driving a short distance. Listen for any unusual sounds and recheck the clamps if necessary.
Installing a canopy on your bakkie is simple with the right steps. Ensure all tools are ready and the canopy fits well. This will give you a reliable canopy that enhances your bakkie’s functionality.
Maintenance Tips
Keeping your bakkie canopy in good condition is essential. Regular maintenance ensures it lasts longer and stays functional. Here are some helpful tips to keep your canopy in top shape.
Regular Inspections
Perform regular inspections to spot any potential issues. Check for loose bolts, worn-out seals, and cracks. Make it a habit to look over your canopy every month.
- Examine all fasteners and connections.
- Look for signs of rust or corrosion.
- Check the condition of windows and doors.
Repairing Damage
Address any damage immediately to prevent further issues. Small cracks or holes can worsen over time. Quick repairs save money and extend the life of your canopy.
| Type of Damage | Repair Tips |
|---|---|
| Cracks | Use a sealant to fill and seal cracks. |
| Loose Bolts | Tighten or replace loose bolts promptly. |
| Rust | Sand down rust spots and apply a rust-preventive paint. |
For larger repairs, consider seeking professional help. This ensures the job is done correctly and safely.
Regular maintenance keeps your bakkie canopy in excellent condition. Following these simple steps makes a big difference.
Frequently Asked Questions
How Do I Start Making A Bakkie Canopy?
To start making a bakkie canopy, gather materials and tools. Measure your bakkie’s dimensions accurately. Plan the design before beginning construction.
What Materials Are Needed For A Bakkie Canopy?
Materials needed for a bakkie canopy include aluminum sheets, steel tubing, screws, and seals. Also, you need tools like a saw and drill.
How Long Does It Take To Build A Canopy?
Building a bakkie canopy typically takes around 2-3 days. Time can vary based on your experience and complexity of the design.
Can I Customize My Bakkie Canopy Design?
Yes, you can customize your bakkie canopy design. You can add windows, storage compartments, and other features to fit your needs.
Conclusion
Creating a canopy for your bakkie is a rewarding project. It offers both functionality and protection. With the right tools and materials, you can build a sturdy canopy. Follow the steps carefully for the best results. Remember to measure accurately and secure all parts firmly.
Enjoy the process and the benefits of your custom canopy. It will enhance your bakkie’s utility and appearance. Happy building!