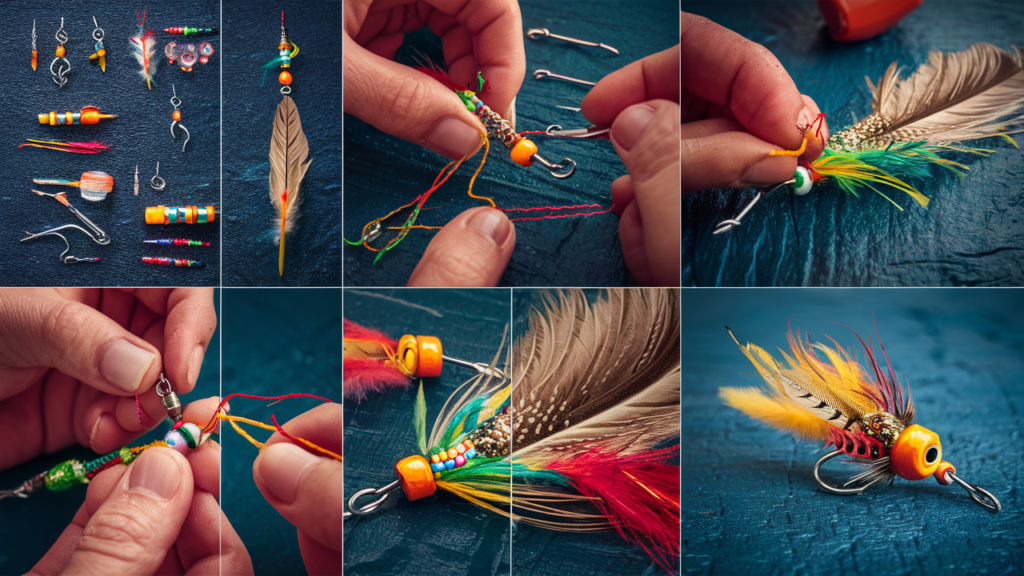
To make ice fishing lures, gather materials like beads, hooks, and wire. Shape the lure based on the fish species you target.
Ice fishing lures are essential for attracting fish in cold waters. Crafting your own lures allows customization to match local conditions and fish preferences. Using the right materials can increase your chances of a successful catch. Many anglers enjoy creating unique designs that stand out in the icy depths.
Whether you’re a beginner or an experienced fisherman, making lures can be a rewarding experience. This process not only saves money but also enhances your fishing skill set. Explore different styles and colors to discover what works best in your fishing spots. Get ready to improve your ice fishing game with homemade lures!
Introduction To Ice Fishing
Ice fishing is a thrilling winter activity. It allows anglers to catch fish through frozen lakes. This unique method of fishing requires special skills and tools. Understanding the basics is vital for success.
The Lure Of Ice Fishing
Ice fishing attracts many enthusiasts for several reasons:
- Adventure: Experience the beauty of winter landscapes.
- Tranquility: Enjoy peaceful moments on the ice.
- Community: Join fellow anglers and share tips.
- Challenge: Test your skills against nature.
Each outing offers new experiences and surprises. The thrill of catching fish through ice is unmatched. Many enjoy the challenge of finding the right spot and lure.
Essential Gear For Ice Fishing
Having the right gear is crucial for a successful ice fishing trip. Here’s a list of essential items:
| Gear | Description |
|---|---|
| Ice Auger | Used to drill holes in the ice. |
| Fishing Rod | Shorter rods work best for ice fishing. |
| Reels | Choose reels designed for cold weather. |
| Warm Clothing | Dress in layers to stay warm. |
| Ice Shelter | Protects against wind and cold. |
| Bait and Lures | Use live bait or homemade lures. |
Investing in quality gear enhances your experience. Stay safe and comfortable while enjoying this exciting activity.
Understanding Lure Types
Choosing the right lure is crucial for ice fishing success. Different types of lures attract various fish. Understanding these lure types helps improve your chances on the ice.
Jigs: The Ice Fishing Staple
Jigs are the most popular lures for ice fishing. They work well in many conditions. Here are some key points:
- Design: Jigs have a weighted head.
- Action: They can be bounced or twitched.
- Materials: Made from lead, tungsten, or plastic.
Use jigs in various colors and sizes. Bright colors attract fish in dark waters. Smaller jigs work better in cold weather.
Spoons: Fluttering Attraction
Spoons create a unique fluttering motion. This action mimics injured baitfish. Consider these features:
- Shape: Curved and flat design.
- Sound: Some spoons rattle to attract fish.
- Sizes: Available in small to large options.
Choose shiny spoons for clear water. Dull or matte finishes work in murky conditions. Experiment with different depths to find the sweet spot.
Plastic Baits: Versatile Choices
Plastic baits offer great versatility. They come in various shapes and colors. Here are some benefits:
- Durability: Last longer than traditional baits.
- Customization: Can be rigged in multiple ways.
- Attraction: Many imitate live bait perfectly.
Use plastic baits for panfish, trout, and more. Choose scents that entice fish. Pair them with jigs for added effectiveness.
Materials Needed For Diy Lures
Creating your own ice fishing lures can be fun and rewarding. The right materials make all the difference in your DIY lures. Gather the components and tools you need to start crafting effective lures.
Basic Components
Understanding the basic components of ice fishing lures is essential. Here’s a list of what you will need:
- Hooks: Choose sizes that match your target fish.
- Weights: Use split shots or jig heads to sink your lure.
- Bait: Use soft plastic or natural bait for attraction.
- Paint: Bright colors attract fish in icy waters.
- Flashers: Add reflective materials for visibility.
Tools Of The Trade
Having the right tools makes lure-making easier. Here’s a simple list of necessary tools:
| Tool | Purpose |
|---|---|
| Pliers | For bending hooks and attaching components. |
| Scissors | To cut materials like line and bait. |
| Drill | For making holes in your lure if needed. |
| Paintbrushes | To apply paint evenly on your lures. |
| Heat source | To shape and mold plastic materials. |
Gathering these materials and tools sets you up for success. Get creative and start making your own ice fishing lures!

Designing Your Lure
Creating effective ice fishing lures requires careful design. The right design attracts fish and improves your chances of a successful catch. Focus on two main aspects: shape and color.
Selecting The Right Shape
The shape of your lure affects its movement and visibility. Different fish prefer different shapes. Here are common shapes to consider:
- Spoon: Reflects light well.
- Jig: Mimics small prey.
- Swimbait: Imitates swimming action.
- Drop Shot: Hangs bait in the water.
Experiment with various shapes to see what works best. Consider these factors:
| Shape | Best For |
|---|---|
| Spoon | Trout, Walleye |
| Jig | Panfish |
| Swimbait | Bass |
| Drop Shot | Various species |
Choosing Colors And Patterns
Colors and patterns greatly influence fish attraction. Bright colors stand out in dark waters. Use these tips for color selection:
- Bright colors: Great for cloudy days.
- Natural colors: Mimic real prey.
- Metallic finishes: Reflect light and attract attention.
Consider patterns as well. Stripes and spots can make your lure more realistic. Try different combinations to see what works. Keep these points in mind:
- Local fish species may prefer specific colors.
- Water clarity can affect color choices.
- Seasonal changes might influence fish behavior.
Creating A Jig Step-by-step
Making your own ice fishing lures can be fun and rewarding. Jigs are popular lures that attract fish effectively. Follow these steps to create your own jigs with ease.
Molding The Jig Head
Start by creating the jig head. This is the most crucial part of your lure.
- Gather materials: You need lead, a mold, and a melting pot.
- Heat the lead: Melt the lead in the melting pot until it’s liquid.
- Pour into the mold: Carefully pour the melted lead into the mold.
- Cool down: Let the mold cool for a few minutes before removing the jig head.
Check the jig head for any imperfections. Smooth out rough edges if needed.
Attaching The Hook
Next, attach the hook to the jig head. This step is simple but essential.
- Select a hook: Choose the right size for your jig head.
- Insert the hook: Push the hook through the jig head’s eyelet.
- Secure the hook: Use pliers to bend the wire and lock the hook in place.
Make sure the hook is firmly attached. This ensures better fishing results.
Finishing Touches
Add some final details to make your jig more appealing.
- Paint the jig: Use waterproof paint for a vibrant look.
- Add glitter: Mix in glitter for extra attraction.
- Attach a tail: Use feathers or plastic for movement in the water.
Let the paint dry completely before using your jig. Your custom jig is now ready for ice fishing!
Assembling A Spoon Lure
Creating an effective spoon lure is simple and fun. Spoon lures attract fish with their unique shape and shiny finish. This section guides you through the steps to assemble one efficiently.
Cutting The Spoon Blank
Start with a metal sheet. Use a thin aluminum or stainless steel sheet for best results. Follow these steps:
- Measure your desired size. A typical spoon lure is 2 to 4 inches long.
- Mark the shape on the metal sheet.
- Carefully cut along the marked line. Use tin snips for a clean edge.
Ensure the edges are smooth to avoid injury and improve performance.
Adding The Shine
Shiny finishes attract fish. Here are some methods to add shine:
- Polishing: Use a metal polish to buff the surface.
- Painting: Apply reflective paint for vibrant colors.
- Adhesive Foil: Stick shiny foil to create an eye-catching look.
Experiment with colors and finishes. Bright colors often yield better results.
Hook And Split Ring Attachment
Attach the hook and split ring to complete your lure.
Follow these steps:
- Choose a treble hook. Size 6 or 8 works well.
- Use a split ring to connect the hook. This allows for easy replacement.
To attach:
- Open the split ring with pliers.
- Slide the hook onto the split ring.
- Close the split ring securely.
Your spoon lure is now ready for ice fishing!
Crafting Plastic Baits
Crafting plastic baits is an exciting part of ice fishing. These lures attract fish with their movement and color. Making your own allows for customization. Let’s explore how to create effective plastic baits.
Pouring The Mold
Pouring the mold is the first step in making plastic baits. Here’s what you need:
- Plastic lure material
- Heat source (like a microwave)
- Mold (silicone or metal)
Follow these steps for pouring:
- Heat the plastic until it melts.
- Carefully pour the liquid into the mold.
- Let it cool for a few minutes.
Check for air bubbles. They can ruin the lure’s effectiveness.
Customizing Textures And Details
Customization adds uniqueness to your lures. Here are some ideas:
- Textures: Use sandpaper to create rough surfaces.
- Colors: Mix dyes into the melted plastic.
- Shapes: Experiment with different molds.
Adding glitter can enhance visibility in water. Use a small amount for a sparkly effect.
Curing And Storage Tips
Proper curing and storage ensure your lures last. Follow these tips:
- Let the lures cure for 24 hours.
- Store in a cool, dry place.
- Avoid direct sunlight to prevent melting.
Use airtight containers to keep lures safe. Label each container for easy access.
Testing And Tweaking Your Lures
Testing and tweaking your ice fishing lures is essential for success. Fine-tuning your lures helps catch more fish. Follow these steps to ensure your lures perform well on the ice.
Water Testing For Balance
Before hitting the ice, test your lures in water. This step checks for balance and movement. An unbalanced lure won’t attract fish. Here’s how to conduct your water test:
- Fill a bucket with water.
- Drop in your lure.
- Observe how it sinks.
Note these points:
| Observation | Action |
|---|---|
| Floats at the top | Add weight |
| Sinks too quickly | Reduce weight |
| Tilts to one side | Adjust weight distribution |
Adjusting Weight And Action
Adjusting weight affects how your lure moves underwater. Proper weight creates a natural swimming action. Follow these steps for adjustments:
- Start with a standard weight for your lure.
- Test it in water.
- Add or remove weight based on your observations.
- Check the action. Does it mimic baitfish?
Try different weights:
- Use split shots for small adjustments.
- Try different hook sizes to change weight.
- Experiment with materials like lead or tungsten.
Remember, every small tweak can make a difference.
Safety Tips While Crafting
Creating ice fishing lures can be fun and rewarding. Safety must come first. Always prioritize your well-being while crafting. Here are essential safety tips to follow.
Handling Sharp Tools
Many tools used for crafting can be very sharp. Follow these tips to stay safe:
- Use cut-resistant gloves.
- Always cut away from your body.
- Keep tools in good condition.
- Store sharp tools out of reach.
- Always focus on the task at hand.
Keep a first aid kit nearby. Accidents can happen, and it’s better to be prepared.
Working With Heated Materials
Some crafting techniques involve heat. This can pose risks. Follow these guidelines:
- Always wear heat-resistant gloves.
- Use tools designed for heating safely.
- Ensure proper ventilation in your workspace.
- Keep flammable materials away from heat sources.
- Never leave heated materials unattended.
Understanding safety while working with heat makes crafting safer. Stay alert and be cautious.
Preservation And Maintenance
Keeping your handmade ice fishing lures in top shape is crucial. Proper care extends their lifespan. Follow these tips for effective preservation and maintenance.
Storing Your Handmade Lures
Proper storage prevents damage and keeps lures ready for use. Here are some storage tips:
- Use a tackle box: A tackle box protects lures from moisture.
- Avoid sunlight: Direct sunlight can fade colors and weaken materials.
- Organize by type: Keep similar lures together for easy access.
- Label compartments: Clear labeling helps find lures quickly.
Routine Checks And Repairs
Regular checks ensure your lures remain functional. Inspect them for wear and tear. Here’s what to do:
- Examine hooks: Look for rust or dullness. Replace if necessary.
- Check paint: Look for chips or scratches. Touch up with paint.
- Inspect swivels: Ensure they turn freely. Replace if stuck.
- Test weights: Confirm they are intact. Adjust if needed.
Storing and maintaining your handmade lures properly makes fishing trips more enjoyable. Keep them organized and check them regularly for the best results.
Legal Considerations
Creating your own ice fishing lures is exciting. Yet, it’s crucial to understand the legal aspects. Different regions have various rules. Being informed helps you avoid fines and ensures responsible fishing.
Regulations On Homemade Lures
Each state or province may have specific regulations about homemade lures. Here are some common rules:
- Check local fishing regulations.
- Ensure lures do not harm fish populations.
- Some areas prohibit certain materials.
- Label homemade lures correctly, if required.
Always verify the rules for your specific location. A quick online search can provide the latest regulations. Respecting these rules maintains a healthy fishing environment.
Environmental Impact And Ethics
Making ice fishing lures involves more than just creativity. Consider the environmental impact:
| Material | Impact |
|---|---|
| Plastic | Can pollute water bodies. |
| Lead | Toxic to aquatic life. |
| Wood | Biodegradable, but sourced sustainably. |
Choose materials wisely. Ethical fishing practices protect ecosystems. Always dispose of lures properly. Avoid littering to keep waters clean.
Respect nature and its inhabitants. This ensures future generations can enjoy ice fishing too.
Frequently Asked Questions
How Do I Choose Materials For Ice Fishing Lures?
Selecting materials for ice fishing lures depends on the fish species targeted. Common materials include metal, plastic, and wood. Consider water clarity and temperature when choosing colors. Bright colors work well in murky water, while natural hues are better for clear conditions.
Experimenting with different materials can enhance your success.
What Types Of Ice Fishing Lures Are Most Effective?
Popular types of ice fishing lures include jigs, spoons, and soft plastics. Jigs are versatile and can mimic various baitfish. Spoons produce vibrations that attract fish. Soft plastics can be rigged in various ways for presentation. Testing different lure types will help you find what works best in your area.
Can I Make Ice Fishing Lures At Home?
Yes, making ice fishing lures at home is easy and rewarding. You can use simple materials like beads, hooks, and weights. There are numerous tutorials available online to guide you. Homemade lures can be customized for specific fishing conditions, giving you an advantage on the ice.
What Colors Attract Fish In Ice Fishing?
Colors that attract fish can vary by location and species. Bright colors like chartreuse and pink work well in low visibility. In clear waters, natural colors such as silver, gold, or white are more effective. Always consider the local environment and experiment with different shades to see what attracts fish.
Conclusion
Crafting your own ice fishing lures can enhance your fishing experience. It allows for creativity and personalization. Experiment with different materials and designs to find what works best. Remember, practice makes perfect. With time, you’ll develop lures that attract more fish and improve your success on the ice.
Happy fishing!


