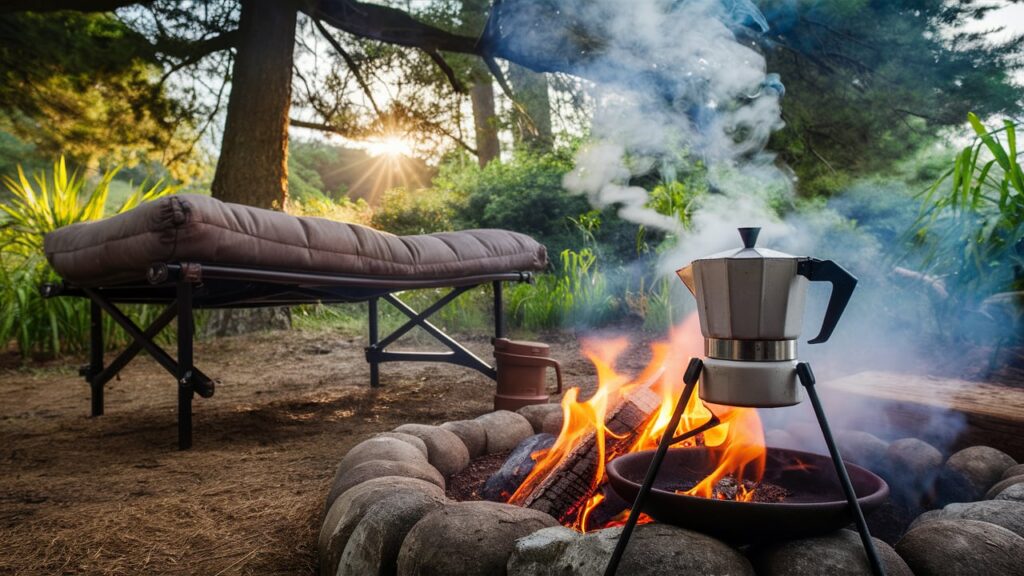
A camping coffee percolator works by brewing coffee using a simple, efficient process. Water heats up, rises through a tube, and then drips over ground coffee.
Recommended Best Camping Percolator 2025
| Recommendation | Product |
| Best Overall | COLETTI Bozeman Percolator Coffee Pot |
| Popular Choice | Farberware 50124 Classic Coffee Percolator |
| Best Value | STANLEY Adventure Brew French Press |
| Best Budget | Primula Today Aluminum Percolator |
| Another Excellent Pick | Elite Gourmet Classic Stovetop Coffee Percolator |
Camping trips can be exhilarating, but the lack of a good coffee maker can sometimes dull the experience. For many, starting the day with a fresh cup of coffee is essential. A camping coffee percolator makes this possible, even in the wild.
It uses basic principles of physics to brew coffee, making it a reliable choice for outdoor enthusiasts. Understanding how it works can enhance your camping experience and ensure you enjoy that perfect cup of coffee every time. This simple tool brings a touch of home comfort to your adventures in nature.
Introduction To Camping Coffee Percolators
Camping coffee percolators brew coffee by cycling boiling water through coffee grounds. This process creates a strong and flavorful cup of coffee. Ideal for outdoor enthusiasts who enjoy a fresh brew in nature.
A camping coffee percolator is a handy tool for outdoor coffee lovers. It brews delicious coffee even when you’re far from home. This tool is simple to use and perfect for camping trips.
Importance Of Coffee While Camping
Coffee is essential for many campers. It provides energy and warmth. Mornings in the wild can be chilly. A hot cup of coffee can make all the difference. It boosts morale and starts the day on a positive note.
History Of Coffee Percolators
Coffee percolators have a rich history. The first percolator was invented in the early 19th century. It quickly became popular due to its simple design. Over the years, it has evolved but retained its charm. Today, many campers prefer it for its reliability and ease of use.
“`
Components Of A Camping Coffee Percolator
When venturing into the great outdoors, a hot cup of coffee can be a delightful start to your day. A camping coffee percolator is a trusty tool that ensures you get your caffeine fix even in the wilderness. To understand how it works, it’s important to get to know its components. Let’s break down the parts of a camping coffee percolator and see what makes it tick.
Main Body
The main body of the percolator is the container that holds the water. It’s typically made of durable materials like stainless steel or aluminum. The main body is designed to withstand the high temperatures of boiling water. It’s also the part of the percolator that you place directly on your camping stove or fire.
Percolator Basket
The percolator basket is where the magic happens. This basket holds the ground coffee. It has small holes that allow water to pass through while keeping the coffee grounds contained. Think of it as a filter. The design ensures that the grounds don’t end up in your cup, giving you a smooth and enjoyable coffee experience.
Percolator Tube
The percolator tube is a central piece that connects the bottom of the percolator to the basket. As the water heats up, it travels up this tube and then drips over the coffee grounds in the basket. This cycle repeats, with the water becoming more infused with coffee each time, leading to a rich brew. It’s a simple yet ingenious mechanism.
Lid And Handle
The lid and handle are essential for convenience and safety. The lid covers the top of the percolator, keeping the heat in and preventing spills. The handle is usually heat-resistant, allowing you to pour your coffee without burning your hands. A good lid and handle make the percolator easy to use, even when you’re half-awake and in need of that first cup of coffee.
Understanding these components will help you appreciate the elegance and simplicity of a camping coffee percolator. Next time you’re out in nature, you’ll know exactly how your percolator works to deliver that perfect cup of coffee.
How A Coffee Percolator Works
Understanding how a camping coffee percolator works can make your outdoor experience more enjoyable. This simple device brews coffee by cycling boiling water through the coffee grounds. Let’s dive into the process.
Water Heating Process
The water heating process starts with placing the percolator over a heat source. This can be a campfire or a portable stove. The heat causes the water in the bottom chamber to boil. As the water heats up, it creates pressure. This pressure pushes the water upwards through a central tube.
Brewing Cycle
The brewing cycle begins as the hot water rises through the tube. The water then reaches the top and is dispersed over the coffee grounds. The water filters through the coffee grounds, extracting flavors and oils. This process repeats several times during brewing.
Percolation Process
The percolation process is continuous and cycles until the coffee reaches the desired strength. The boiling water repeatedly passes through the coffee grounds. This ensures a rich and robust flavor. Each cycle enhances the coffee’s strength and taste. The final result is a hot, aromatic cup of coffee ready to be enjoyed in the great outdoors.
Types Of Camping Coffee Percolators
Camping coffee percolators are essential for brewing fresh coffee outdoors. They come in various types, each suited for different camping needs. Understanding the different types can help you choose the best one for your adventure.
Stovetop Percolators
Stovetop percolators are a popular choice for camping. They are easy to use and require a heat source. Place them directly over a campfire or camping stove. The process is simple. Water heats up and moves through a tube, passing through the coffee grounds. This method ensures a rich, strong brew.
Electric Percolators
Electric percolators are convenient if you have access to electricity. They work similarly to stovetop versions but plug into a power source. Ideal for RV camping or campsites with electrical hookups. These percolators heat water quickly and maintain a consistent temperature.
Portable Percolators
Portable percolators are lightweight and easy to carry. They are perfect for backpacking or hiking trips. Some models are manual, using a hand pump to move water through the coffee grounds. Others may use small propane canisters for heating. They offer flexibility and convenience in remote locations.
Choosing The Right Coffee Percolator
Finding the perfect coffee percolator for your camping trips is like finding the right pair of hiking boots. You want something reliable, durable, and just the right size. With so many options out there, it can feel a bit overwhelming. But fear not! We’re here to help you navigate through the key factors to consider when choosing a coffee percolator that fits your needs perfectly.
Material And Durability
When it comes to camping gear, durability is king. Your coffee percolator needs to withstand the rugged outdoors. Most percolators are made from stainless steel, aluminum, or enamel-coated steel. Stainless steel is tough and rust-resistant, making it a top choice for many campers. Aluminum is lighter but can dent more easily. Enamel-coated steel offers a vintage look and is quite sturdy, though it may chip over time.
For example, I once took an enamel-coated percolator on a week-long camping trip. It brewed excellent coffee, but by the end of the trip, it had a few chips. So, if you’re a bit clumsy like me, stainless steel might be your best bet!
Size And Capacity
Size matters, especially when you’re packing for a camping trip. Consider how many coffee drinkers will be in your group. Percolators come in various sizes, from 2-cup to 12-cup capacities. A small 4-cup percolator is perfect for solo adventurers or couples, while a 12-cup one can serve a whole family or a group of friends.
On a memorable camping trip with friends, our trusty 8-cup percolator became the star of our mornings. It brewed enough coffee to keep us all happy without taking up too much space in our packs.
Ease Of Use
Camping is all about enjoying the great outdoors, so your coffee percolator should be easy to use. Look for one with a clear knob on the lid, allowing you to see when the coffee is ready. A sturdy handle that stays cool is also a big plus, especially when you’re handling hot liquid.
Consider whether the percolator has a built-in filter basket. Some models require paper filters, while others have a permanent metal filter. The latter is more convenient and eco-friendly, saving you from carrying extra supplies and reducing waste.
One time, I forgot to bring paper filters and had to improvise with a bandana. It worked, but it wasn’t ideal. Since then, I’ve always opted for percolators with built-in filters.
Choosing the right coffee percolator can make or break your camping experience. By considering the material, size, and ease of use, you’ll find the perfect percolator to keep your mornings bright and your spirits high.
Brewing The Perfect Cup Of Coffee
Nothing beats the fresh aroma of coffee wafting through your campsite in the morning. It’s the little things that make camping magical, and a well-brewed cup of coffee is definitely one of them. Using a camping coffee percolator might seem old-fashioned, but it’s a reliable way to get that perfect cup. Let’s dive into the key aspects that ensure your coffee turns out just right.
Selecting The Right Coffee Beans
The journey to a delicious cup of coffee starts with selecting the right beans. Not all coffee beans are created equal. For camping, it’s best to choose medium or dark roast beans. They tend to have a stronger flavor which can be a lifesaver when you need that extra kick in the morning.
- Medium Roast: Balanced flavor, good for most coffee drinkers.
- Dark Roast: Stronger flavor, less acidic, perfect for a bold cup.
Pro Tip: Always opt for freshly roasted beans. They might be a bit pricier, but the taste difference is noticeable and worth every penny.
Proper Grind Size
Grind size is crucial when using a percolator. Too fine, and your coffee might turn out bitter; too coarse, and it could be weak. Aim for a medium-coarse grind for the best results.
Think of it like this: the grind size determines how fast water passes through the coffee. A medium-coarse grind allows for just the right extraction time, ensuring your coffee is neither too strong nor too weak.
- Invest in a good quality grinder. Consistent grind size is key.
- Grind your beans just before brewing. Freshness matters!
Brewing Time And Temperature
Now, onto the actual brewing process. Timing and temperature play pivotal roles in the taste of your coffee. Ideally, you want to brew your coffee for about 7-10 minutes. Too short, and the coffee will be under-extracted; too long, and it might turn out bitter.
| Brewing Time | Temperature |
|---|---|
| 7-10 minutes | 195-205°F (90-96°C) |
Here’s a quick guide:
- Start with cold water: Place the percolator over a campfire or stove.
- Watch the bubbles: Once it starts percolating (bubbling), reduce the heat.
- Check the color: The coffee should be a rich, dark color. Once it is, remove it from heat.
Remember, patience is key. Good coffee takes time. While you wait, enjoy the morning sounds of nature.
And there you have it! With the right beans, grind size, and attention to brewing time and temperature, you’ll be the campsite barista in no time. Happy camping and even happier brewing!
Maintenance And Cleaning
Owning a camping coffee percolator is a joy for outdoor enthusiasts. But keeping it in top shape requires regular maintenance and cleaning. This ensures your percolator remains efficient and your coffee tastes great. Let’s dive into some straightforward tips and procedures for maintaining your trusty camping companion.
Regular Cleaning Tips
Regular cleaning is essential to prevent the build-up of coffee oils and residue. Here are some simple steps to follow after each use:
- Allow the percolator to cool down before handling.
- Disassemble all removable parts such as the basket, stem, and lid.
- Rinse each part with warm water to remove coffee grounds and oils.
- Use a mild dish soap and a soft brush to clean the inside of the pot. Avoid abrasive sponges that may scratch the surface.
- Rinse thoroughly to ensure no soap residue remains.
- Dry all parts completely before reassembling to prevent moisture build-up.
Deep Cleaning Procedures
Over time, deeper cleaning is necessary to keep your percolator in prime condition. Here’s how to do a thorough clean:
- Fill the percolator with a mixture of equal parts water and white vinegar.
- Assemble the percolator and let it brew as if you were making coffee. This helps to descale and remove stubborn stains.
- Once the cycle is complete, discard the vinegar solution and rinse the percolator thoroughly with clean water.
- For tough stains, use a paste made from baking soda and water, gently scrubbing with a soft brush.
- Rinse again and ensure all parts are completely dry before storing.
Storage Advice
Proper storage is key to prolonging the life of your camping coffee percolator. Here are some storage tips:
- Store your percolator in a dry place to prevent rust or mold.
- Keep it assembled to avoid losing small parts, but ensure it is completely dry to avoid moisture build-up.
- If space allows, store it in its original box or a dedicated camping gear bag to protect it from dents and scratches.
By following these simple maintenance and cleaning tips, you can enjoy delicious coffee on all your camping adventures for years to come. Remember, a clean percolator not only makes better coffee but also lasts longer. Happy brewing!
Troubleshooting Common Issues
Camping coffee percolators are a fantastic way to enjoy a fresh cup of coffee in the great outdoors. However, like any tool, they can sometimes run into issues. Knowing how to troubleshoot these common problems can make the difference between a perfect brew and a disappointing experience. Let’s dive into some typical problems you might encounter and how to fix them.
Weak Coffee
One of the most frustrating issues when using a camping coffee percolator is ending up with weak coffee. Nobody wants to start their day with a lackluster cup of joe! Here are a few tips to ensure your coffee packs a punch:
- Use the right amount of coffee grounds: Make sure you’re using the correct coffee-to-water ratio. A general rule of thumb is one tablespoon of coffee per cup of water.
- Check the grind size: If the coffee grounds are too coarse, the water will pass through too quickly, resulting in weak coffee. Aim for a medium grind for best results.
- Percolate for the right amount of time: Aim for 6 to 8 minutes of percolation. Too short, and your coffee will be weak; too long, and it might get bitter.
Over-brewing
Over-brewing can lead to a bitter and unpleasant cup of coffee. It’s a fine balance, but here’s how to avoid over-brewing:
- Monitor the brew time: Keep an eye on the clock. Once you hear that percolating sound, set a timer for 6 to 8 minutes.
- Control the heat: Too high a heat can cause the coffee to brew too quickly. Keep the flame low to medium to ensure a steady, even brew.
- Check the coffee basket: If it’s overfilled, it can cause over-extraction. Stick to the recommended amount of coffee grounds.
Clogged Percolator
Sometimes, your percolator might get clogged. This can prevent proper brewing and lead to frustration. Here’s how to troubleshoot this issue:
- Clean regularly: Residue buildup can cause clogging. After each use, make sure to thoroughly clean all parts of the percolator.
- Inspect the basket and tube: Check for any coffee grounds or debris that might be blocking the flow. A quick rinse can often do the trick.
- Use a paper filter: While not always necessary, using a paper filter can help prevent grounds from clogging the percolator.
By following these tips and tricks, you can tackle common issues with your camping coffee percolator and ensure a delicious, satisfying brew every time. Remember, practice makes perfect, and soon you’ll be brewing coffee like a seasoned camper!
Benefits Of Using A Coffee Percolator
When you’re out in the great outdoors, starting your day with a cup of coffee can be a true delight. But how does a camping coffee percolator work, and why should you consider using one? Let’s dive into the benefits of using a coffee percolator on your next camping trip.
Enhanced Flavor
One of the main perks of using a coffee percolator is the enhanced flavor it brings to your coffee. Percolators are designed to brew coffee by cycling boiling water through the coffee grounds multiple times. This process extracts a deep, rich flavor that many coffee lovers find irresistible. Imagine sitting by the campfire, sipping on a cup of coffee that’s bursting with robust taste. It’s like a warm hug in a cup.
Portability
Let’s talk about portability. When camping, space and weight are crucial considerations. Coffee percolators are generally compact and lightweight, making them easy to pack and carry. Whether you’re hiking, car camping, or just enjoying a weekend in the woods, a percolator won’t weigh you down. Plus, they don’t need electricity, so you can make coffee anywhere, anytime.
Versatility
Another fantastic benefit is the versatility of a coffee percolator. It’s not just for coffee! You can use it to make tea, hot chocolate, or even boil water for instant meals. This multipurpose tool can save space in your camping gear and make your outdoor experience more enjoyable. Imagine having one device that can cater to all your hot beverage needs. How convenient is that?
In conclusion, using a coffee percolator while camping offers several benefits. From the rich flavor to the convenience of a portable and versatile tool, it’s a must-have for any coffee-loving camper. So, next time you pack for an adventure, don’t forget your trusty coffee percolator!
Frequently Asked Questions
How Do You Use A Camping Coffee Percolator?
Fill the percolator with water. Add coffee grounds to the basket. Assemble the percolator. Heat over a campfire or stove until it starts percolating. Brew for 5-10 minutes. Enjoy your coffee!
Why Did People Stop Using Percolators?
People stopped using percolators due to inconsistent brewing, bitter taste, and the rise of drip coffee makers offering better flavor and convenience.
How Does A Coffee Percolator Work Step By Step?
A coffee percolator works by heating water in the bottom chamber. The hot water rises through a tube. It then passes over the coffee grounds. The brewed coffee drips back down into the pot. The cycle repeats until the desired strength is reached.
How Long Do You Let Camp Coffee Percolate?
Let camp coffee percolate for 7-10 minutes. Adjust time based on your preferred coffee strength.
Conclusion
A camping coffee percolator is a great tool for outdoor adventures. It brews rich, flavorful coffee using a simple process. Heat water, let it circulate, and enjoy. Easy to use and clean, it fits well in camping gear. Choose a percolator for your next trip.
Savor every sip of fresh, hot coffee amidst nature. Happy camping and brewing!