Soil preparation is key for a healthy garden. Garden tillers make this job easier.
Recommended Best Garden Tille 2025
| Recommendation | Product |
| Best Overall | Sun Joe Electric Garden Tiller Cultivator |
| Popular Choice | LawnMaster TE1318W1 Corded Electric Tiller |
| Best Value | Alloyman 20V Cordless Tiller Cultivator |
| Best Budget | Earthwise Cordless Electric Garden Tiller |
| Another Excellent Pick | MZK 20V Cordless Tiller Cultivator |
In this blog post, we will explore the basics of soil preparation. You’ll learn why garden tillers are essential tools for creating optimal seedbed conditions. By understanding when and how to use these machines, you can give your plants the best start.
Whether you’re a beginner or an experienced gardener, this guide will help you achieve a thriving garden. Dive in to discover practical tips and insights for using garden tillers effectively. Your garden will thank you for it!
Importance Of Soil Preparation
Proper soil preparation is crucial for a successful garden. It sets the foundation for healthy plant growth and ensures optimal seedbed conditions. Whether you’re a seasoned gardener or just starting, understanding the importance of soil preparation can make all the difference in your gardening results.
Benefits For Plant Growth
Good soil preparation promotes robust plant growth. It ensures that roots can easily access nutrients and water. This results in healthier plants that are more resistant to diseases and pests.
Using garden tillers helps mix organic matter into the soil. This improves soil structure and fertility. You’ll notice your plants growing stronger and more vibrant.
Think about this: What would happen if your plants can’t access the nutrients they need? Soil preparation addresses this crucial aspect.
Preventing Soil Compaction
Soil compaction is a common issue that can hinder plant growth. Compact soil reduces air spaces and water movement, making it difficult for roots to spread.
Garden tillers break up compacted soil. This process aerates the soil, creating a healthier environment for plant roots.
Loose soil allows roots to breathe and grow freely. This leads to better overall plant health and productivity.
Have you noticed your plants struggling to grow? Preventing soil compaction through proper tilling can help solve this issue.
In summary, the importance of soil preparation cannot be overstated. By using garden tillers effectively, you can create ideal conditions for plant growth and prevent soil compaction. Your garden will thank you with lush, thriving plants.
Understanding Garden Tillers
Preparing soil is crucial for a healthy garden. Garden tillers help in breaking up hard soil, mixing in nutrients, and creating ideal conditions for seeds. These tools make the task easier and more efficient.
Not all tillers are the same. Knowing the types and how to choose the right one can make a big difference in your gardening success.
Types Of Tillers
Garden tillers come in two main types: front-tine and rear-tine. Each type serves different purposes and is suited for various tasks.
Front-tine tillers are good for small to medium gardens. They are lighter and easier to maneuver. These tillers are best for soil that is not very hard or compact.
Rear-tine tillers are more powerful. They are better for larger gardens and tougher soil. These tillers can dig deeper and handle heavier tasks. They are more stable, making them easier to use on hard ground.
Choosing The Right Tiller
Selecting the right tiller depends on your garden size, soil type, and the tasks you need to perform.
For small gardens with loose soil, a front-tine tiller works well. It is easy to handle and gets the job done efficiently.
For larger gardens or hard soil, choose a rear-tine tiller. Its power and stability will help you prepare the soil better. Consider the tiller’s weight and ease of use. A heavier tiller might be harder to move, but it will work better on tough soil.
Always read reviews and check the tiller’s features. Look for adjustable tilling depth and width. These features give you more control over your gardening tasks.
When To Till Your Garden
Prepare your garden soil in early spring or fall. Use garden tillers when the soil is dry and workable. This creates the perfect seedbed for planting.
Knowing when to till your garden can make a big difference. Tilling at the right time helps you create the best seedbed for your plants. It also improves soil health and boosts plant growth. So, when is the best time to till your garden?
Optimal Tilling Time
Tilling is best done in spring. The soil should be dry enough to crumble in your hand. Wet soil can be hard to till and may damage your plants. Late fall is also a good time for tilling. It helps mix organic matter into the soil before winter.
Signs Your Soil Needs Tilling
Look for these signs to know if your soil needs tilling:
1. Hard, compacted soil is tough for roots to grow.
2. Poor drainage causes water to pool on the surface.
3. Weeds grow faster than your plants.
4. Organic matter is not breaking down well.
These signs mean your soil needs a good tilling. Proper tilling helps improve soil structure and plant growth.
When you till your garden at the right time, it leads to healthier plants and better yields.
Preparing Your Garden For Tilling
Preparing your garden for tilling is a crucial step in soil preparation. Proper preparation ensures that your soil is in the best condition for planting. This process involves a few essential tasks that set the stage for successful tilling.
Clearing Debris
Before tilling, remove all debris from the garden area. This includes rocks, sticks, and old plant material. Clearing debris prevents damage to your tiller and helps it run smoothly. A clean garden bed also ensures better mixing of the soil.
Moistening The Soil
Moisten the soil a day or two before tilling. Wet soil is easier to till and less likely to form clumps. Use a garden hose to lightly water the area. Avoid over-watering as soggy soil can compact and become difficult to work with.
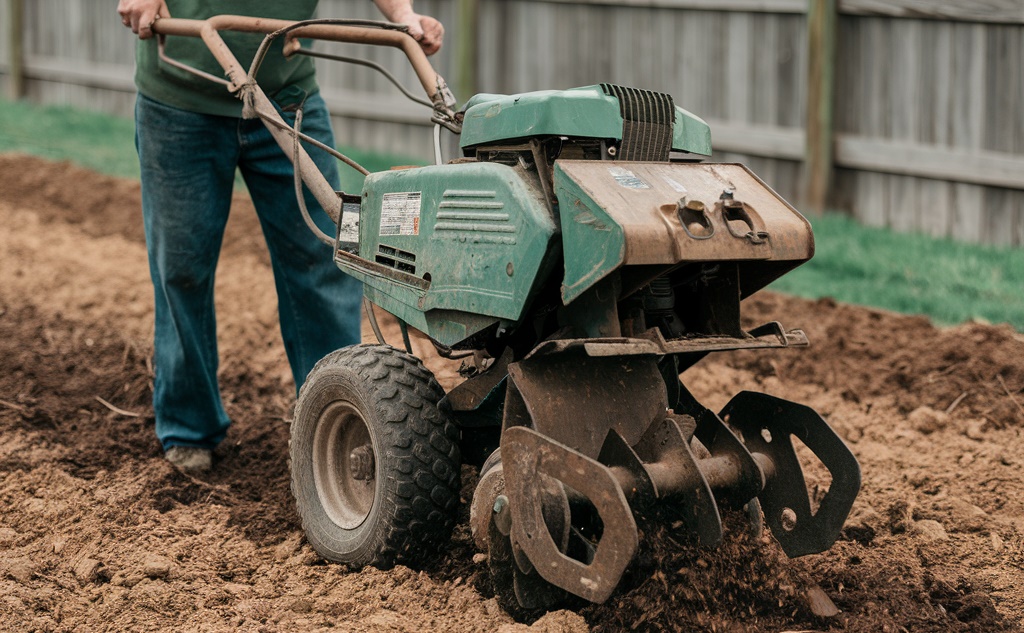
How To Use Garden Tillers
Using garden tillers can greatly enhance your soil preparation. This tool helps break up compacted soil, allowing air and nutrients to penetrate more effectively. Follow these steps to use a garden tiller properly.
Setting Up The Tiller
Before starting, check the tiller’s oil and fuel levels. Make sure they are sufficient. Inspect the tines for any damage. Replace them if needed.
Adjust the tiller’s depth setting according to your soil type. Light soils need a shallow setting. Hard soils require a deeper setting. This ensures even tilling and prepares the seedbed well.
Ensure the area you plan to till is free of large rocks and debris. These can damage the tiller and impede its performance. Mark the boundaries of your garden area clearly.
Tilling Techniques
Start the tiller and let it warm up for a few minutes. Engage the tines by squeezing the handle. Guide the tiller slowly into the soil. Move at a steady pace. Do not rush.
For the first pass, till the soil in one direction. Overlap each row slightly with the next. This ensures complete coverage. On the second pass, till at a right angle to the first pass.
Work the soil until it reaches a fine, crumbly texture. This is ideal for planting. Avoid tilling soil that is too wet. It can become compacted and hard to manage.
After tilling, let the soil rest for a day or two. This allows it to settle. Then, it will be ready for planting your seeds or seedlings.
Safety Tips For Tilling
Before tilling your garden, it’s crucial to prioritize safety. Tilling involves using powerful equipment that can pose risks if not handled properly. Following safety guidelines can help prevent accidents and ensure a smooth gardening experience.
Protective Gear
Always wear protective gear when tilling. Sturdy gloves protect your hands from blisters and sharp objects. Safety goggles shield your eyes from flying debris. Wear long sleeves and pants to protect your skin from scratches and sun exposure. Sturdy, closed-toe shoes provide necessary foot protection.
Handling Equipment Safely
Ensure you understand the equipment’s user manual. Familiarize yourself with all the controls before starting. Before using the tiller, inspect it for any damage or loose parts. Make sure the tiller is off before making any adjustments. Keep your hands and feet away from moving parts while the tiller is running. Always start the tiller in an open area, away from children and pets.
Post-tilling Practices
After tilling, the soil is ready for the next steps. Post-tilling practices help create the best environment for seeds. These steps ensure the soil is ideal for planting and growing. Let’s dive into the essential post-tilling practices.
Leveling The Soil
Leveling the soil is crucial after tilling. Uneven soil can cause water drainage problems. Use a rake to smooth out the surface. This helps seeds settle evenly. The soil should be flat and uniform. This ensures consistent growth for all plants.
Adding Amendments
Soil amendments improve soil quality. Organic matter, like compost, adds nutrients. Spread a layer of compost on the tilled soil. Mix it in with a rake or hoe. This enriches the soil, making it fertile. Lime or sulfur can adjust soil pH. Test the soil first to know what it needs. Proper pH helps plants absorb nutrients better.
Common Tilling Mistakes
Avoiding common tilling mistakes is key for optimal seedbed conditions. Over-tilling can damage soil structure, while under-tilling leaves it compact. Proper timing and technique are essential.
Preparing your soil correctly is crucial for a thriving garden. However, even with the best intentions, it’s easy to make mistakes that can hinder your garden’s success. Below are common tilling mistakes that gardeners often make and how you can avoid them.
Over-tilling
Over-tilling is a common error that can damage soil structure. When you till too much, you break down soil particles excessively. This can lead to soil compaction and reduced aeration, making it harder for roots to grow.
Think of it as over-mixing a cake batter. You want the ingredients combined but not overly beaten. Keep an eye on how often and how deeply you till your garden. Moderation is key.
Tilling Wet Soil
Tilling wet soil is another mistake that can cause long-term damage. Wet soil tends to clump together, forming large, hard clods. These clumps can create an uneven seedbed and make it difficult for plants to establish roots.
Imagine trying to plant in a lumpy field. It’s not ideal, right? Always check the moisture level before you till. If the soil sticks together when you squeeze it, it’s too wet.
By avoiding these common mistakes, you can create the perfect seedbed for your garden. Remember, a little attention to detail goes a long way. What other tilling tips have you found helpful? Share your thoughts!
Maintaining Your Tiller
Proper maintenance of your garden tiller ensures it lasts longer and works efficiently. Regular care helps prevent breakdowns and keeps the machine performing at its best. Let’s explore some essential tips for maintaining your tiller.
Routine Cleaning
After each use, clean your tiller to remove dirt and debris. This prevents rust and keeps the blades sharp. Use a brush or hose to clean the tines and undercarriage.
Check for any stuck stones or plant material. Remove them carefully to avoid damage. Wipe down the tiller with a dry cloth to prevent moisture buildup.
Storage Tips
Store your tiller in a dry, sheltered place. This protects it from weather damage. If you don’t have a shed, cover it with a tarp.
Keep the tiller on a flat surface to prevent tipping. Drain the fuel if storing for more than a month. This prevents engine problems.
Check the tiller periodically during storage. Ensure there are no leaks or signs of wear. Proper storage extends the life of your tiller and keeps it ready for the next season.
Frequently Asked Questions
When Should You Start Tilling Your Garden?
Start tilling your garden in early spring when the soil is dry and workable. Aim for temperatures above 60°F.
How And When To Use A Tiller?
Use a tiller in spring or fall for soil preparation. Break up compact soil and mix in compost. Avoid wet soil to prevent clumping.
When Not To Use A Rototiller?
Avoid using a rototiller in wet soil, rocky ground, or compacted clay. It can damage the tool and soil structure.
How To Use Tiller Correctly?
Use a tiller by starting the engine, adjusting the depth, and guiding it slowly through soil. Avoid rocks and debris.
Conclusion
Proper soil preparation is key for a healthy garden. Using garden tillers helps create ideal seedbed conditions. Break down soil clumps and mix in nutrients. Choose the right tiller for your garden size. Timing matters; till when the soil is moist, not wet.
Follow these steps, and your garden will thrive. Happy gardening!